There are generally two ways to integrate with a third-party service:
- Make an API call.
- Use a client SDK (Software Development Kit), which is a code library (usually in a JAR file).
Most developers prefer using the SDK because it provides all the client code and allows us to directly call methods and use their logic in our application instead of making API calls.
Next, search for “razorpay java client sdk” on Google and click on the link to the Razorpay Java Client SDK.
It is suggested to add the following dependency to our application using the pom.xml file and install it by clicking the top right “Maven icon with refresh icon“:
<dependency>
<groupId>com.razorpay</groupId>
<artifactId>razorpay-java</artifactId>
<version>1.4.6</version>
</dependency>
According to github instructions Razorpay Client can be instantiated via two ways:
- Using Private Auth
Instantiate RazorpayClient with key_id & key_secret. You can obtain the keys from the dashboard app https://dashboard.razorpay.com/#/app/keys// Initialize client
RazorpayClient instance = new RazorpayClient(“key_id”, “key_secret”);
Add custom headers to request (optional)
Map<String, String> headers = new HashMap<String, String>();
razorpayClient.addHeaders(headers); - Using Access Token
Instantiate RazorpayClient with access_token. The access_token can be obtained only in case if you are a platform partner. For more information, refer page – https://razorpay.com/docs/partners/platform/// Initialize client
RazorpayClient instance = new RazorpayClient(“access_token”);
Add custom headers to request (optional)
Map<String, String> headers = new HashMap<String, String>();
razorpayClient.addHeaders(headers);
Next, create a Razorpay account by signing up with Google or email, based on your preference. Fill in basic details such as your name, phone number, PAN card, and the nature of your business. After entering these details, it will ask you for KYC information. Click on the KYC option and then hit the back button. It will ask if you want to be redirected to the dashboard—click yes, so you don’t have to fill in all the bank details.
To get the API key, follow these steps:
- Click on “Accounts and Settings” in the left panel.
- On the next page, find “Website and App Settings” and click on “API Keys.”
- Click the “Create Key” button. This will generate a test key since we are in test mode.
- Copy the generated key ID and key secret or download them because you won’t be able to find them in the dashboard after closing the popup.
Next, go through the document and find the link for “paymentLink” under Supported Resources. Click on that link to access the complete documentation for multiple features. Copy the “Request #1 Standard Payment Link – paymentLinkRequest” section and paste it into the RazorPayGateway class. Import JSONObject, PaymentLink, and @Autowired for RazorpayClient.
Since RazorpayClient is a third-party library, we need to create beans for it.
- Create a config package in the same directory as the controllers package.
- In the config package, create a class ConfigBean and annotate it with @Configuration.
- Create a method named getRazorPayClient and annotate it with @Bean, which will return a RazorpayClient object.
- In this method, create the RazorpayClient object by passing the key and secret.
- To get the key and secret from environment variables, define private string variables key and secret, and annotate them with @Value(“${razorpay.key}”) and @Value(“${razorpay.secret}”) respectively. Import @Value from spring-boot.
- Handle any exceptions using a try-catch block or add them to the method signature.
package com.paymentservice.paymentgateway.config;
import org.springframework.context.annotation.Configuration;
@Configuration
public class ConfigBean {
@Value(“${razorpay.key}”)
private String key;
@Value(“${razorpay.secret}”)
private String secret;
@Bean
public RazorpayClient getRazorpayCleint(){
try {
return new RazorpayClient(key, secret);
} catch (RazorpayException e) {
System.out.println(“Unable to create client for razorpay”);
throw new RuntimeException(“Failed to instantiate razorpay”);
}
}
}
Now, go back to the RazorPayGateway class and modify the paymentLinkRequest object. It should be divided into four parts:
- Main PaymentLinkRequest: This will hold amount, currency, expire_by, and reference_id (assigned to orderId).
- Customer Object: This will hold customer details such as name, contact, and email, and it will be assigned to the customer property of paymentLinkRequest.
- Notify Object: Since we are not using notifications (like SMS or email), we will remove this.
- Notes Object: This will hold any extra info and will be assigned to the notes property of paymentLinkRequest.
Finally, pass the paymentLinkRequest to the razorpayClient.paymentLink.create method, hold the result in an instance of PaymentLink, and return it. The create method may throw exceptions, so handle them accordingly. For the expire_by field, you can use “https://www.epochconverter.com to convert the expiry date to a timestamp, or use LocalDate to create the expiry date.
@Service
public class RazorPayGateway implements PaymentGateway{
private final RazorpayClient razorpayClient;
@Autowired
public RazorPayGateway(RazorpayClient razorpayClient) {
this.razorpayClient = razorpayClient;
}
@Override
public String createPaymentLink(PaymentLinkRequestDto paymentLinkRequestDto) {
/*
There are generally two ways to integrate with a 3rd party
1. Make an api call
2. Client sdk (Code in a jar)
*/
JSONObject paymentLinkRequest = new JSONObject();
paymentLinkRequest.put(“amount”,paymentLinkRequestDto.getAmount());
paymentLinkRequest.put(“currency”,”INR”);
paymentLinkRequest.put(“expire_by”, LocalDate.now().plusDays(7).atStartOfDay(ZoneId.systemDefault()).toEpochSecond());
paymentLinkRequest.put(“reference_id”,paymentLinkRequestDto.getOrderId());
paymentLinkRequest.put(“description”,”Payment for order no ” + paymentLinkRequestDto.getOrderId());
JSONObject customer = new JSONObject();
customer.put(“name”,paymentLinkRequestDto.getCustomerName());
customer.put(“contact”,paymentLinkRequestDto.getPhone());
customer.put(“email”,”[email protected]”);
paymentLinkRequest.put(“customer”,customer);
JSONObject notes = new JSONObject();
notes.put(“policy_name”,”Jeevan Bima”);
paymentLinkRequest.put(“notes”,notes);
paymentLinkRequest.put(“callback_url”,”https://www.geekysanjay.com”);
paymentLinkRequest.put(“callback_method”,”get”);
try {
PaymentLink payment = razorpayClient.paymentLink.create(paymentLinkRequest);
return payment.get(“short_url”);
} catch (RazorpayException e) {
throw new RuntimeException(“Failed to create payment link”, e);
}
}
}
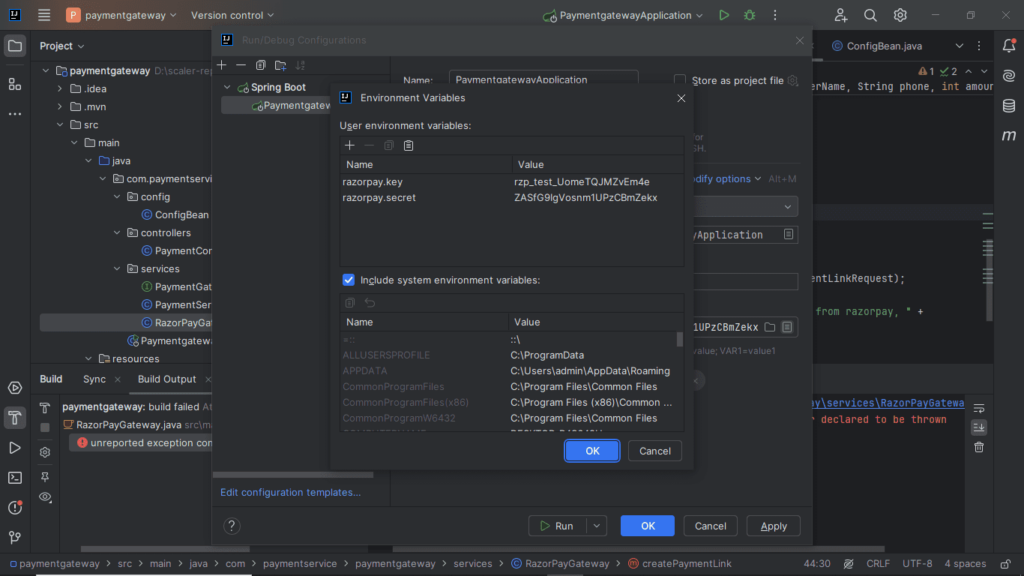
Next, add the environment variables for the key and secret. To do this:
- Open the configuration file by clicking the dropdown near the play button at the top, or go to the Run menu and select “Edit Configurations“
- Click on the “Environment variables” input field (represented by a document icon).
- Add the key and secret with names razorpay.key and razorpay.secret, and use the values generated by your Razorpay account.
If you don’t see the “Environment variables” input field, click on “Modify options” in the same popup, then select “Environment variables” from the menu. This will display the input field where you can add the variables.
